Testing
Sep 22, 2025
Tune in to Live@7withHelen Thursday nights at 7pm on Facebook and YouTube for great deals, demos, sneak peeks and more.

Zippered Bag Tute
Jul 17, 2021
By
wequiltva
0 comment(s)
We apologise that due to the closure of our previous blog platform, some images and links below are no longer active and cannot be restored or supplied.
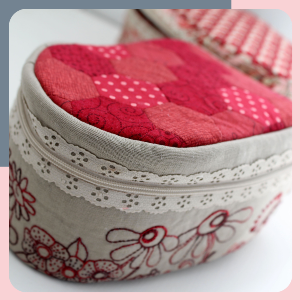
I’ve done a quick photo tutorial whilst making up a second test prototype of my Le fer Tote bag as written instructions can be tricky for some parts of this bag and we have found people struggle with the lining particularly. This method will also apply to the Taffy Apple pouch bag which is made in a similar way.
1. Fuse the foam strips (iron or spray baste) inside the two long zipper strips. Push the foam right up to the fold – there should be a 1/4” gap at the bottom raw edges where there is no foam. (note: if making the original le fer tote you will have already completed the embroider on the bottom part of this panel on linen)
2. Place the two folded edges evenly together – you may want to pin.
3. Lay the 40cm lace zipper right side up over the two edges – the teeth need to sit exactly on the join where they meet. Have the metal end on the left sitting in the seam allowance (so you wont sew over it later and break your needle). Pin well.
4. Using a zipper foot stitch down both sides of the zipper close to the teeth. Move the pull out of the way, stitch past it, then close it back up out of the way. Once finished turn over and make sure you’ve stitched through both sides.
5. Cut out the top and bottom using Template A. (Note: if making the original le fer tote pattern your top will be pieced as hexies, cut the hexie panel to the Template A size.
Join the two Template A pieces (top and bottom of bag) to the back panel. Press seams inwards.
Lay your press panel onto the glue side of foam bag batting (or spray baste non fuse first), place baking paper or ironing sheet over and press to fuse.
Trim to size.
Stitch in the ditch through all layers through both seams.
Place this panel onto your lining fabric and trim to size. Mark with pins on the lining where the seam lines are on the outer panel – press to make a fold. Put your lining aside for later.
6. Make the handle as per instructions. Hand or machine edgestitch. Place it in the centre of the back panel with both edges even and pin. Machine baste if you wish. It won’t sit flat as its a little longer than the panel.
7. Place the short edge of the zipper panel right sides together with the centre of your outer bag panel. (the zip side will be against the right side of the back panel) It will be 1/2” wider than the back part. Pin at the seam lines (1/4” in from both ends). Stitch from the first pin (1/4” in) to the last pin (1/4” before the other edge) – be careful when going past the zip not to hit that metal part.
Repeat for the other edge – you may want to open the zipper pull a tad.
With sharp scissors clip into the start and end point of both ends.
7. Now it starts to get a little fiddly. Turn the zipper panel at the clip point (the seam) so that it follows around the curved end of the outer panel. Pin the edges well so all the raw edges are even. Do the bottom of the bag first.
Stitch 1/4” around the pinned edges. I found it easier to stitch from the foam side – you can see where the end of your stitching row is at the seam (that 1/4” point) this is where you want your row of stitching to start – and yes you want to backtack to secure. You will finish when you reach the start of the stitching line on the other side.
Now you will have a half a bag with the lid or top hanging open. Open the zipper and repeat what you just did – joining the small part of the zipper panel to the lid (or other curved end of the bag panel)
Smoosh it so you can get into that start point at the end of the side stitching line –fiddly yes..
Turn the bag right side out and press out the seams really well with a steam iron.
8. Now we are at the trickiest part. Attaching the lining.
Turn the bag inside out again – so that the fabric is inside the bag and the foam is showing on the outside.
Start by matching a fold of the lining piece to a seam line on the bag. (the seam line between the lid and the back piece of the bag). The right side of the lining will be against the fabric inside the bag. pin the first fold to the seam at the top edge of the bag. Now pin up around the curved edges of the lid – not too hard.
Now we have to pin the other fold to the bottom edge seam. See the first yellow arrove below? that pin is my fold line and it needs to go right down to that bottom seam corner.
Then for the bottom edge you need to tuck the straight edges of the bag inwards and the lining has to reach down to the bottom as per the second yellow arrow. You have to squish and smoosh to get it down there all the way around the bag.
Then turn to the foam side and you are going to stitch around the edges on the same stitch line as before or as close as possible. You will leave a small opening in the side of one bottom edge.
Use a pair of clamps to reach inside your opening, grab the far end and carefully put it all through the opening. (you may want to clip the curves before you turn). Push out all the seams really well. If you did not get the lining all the way to the edges and some seam lines or raw edges are showing you can now adjust and slip stitch the lining better into place.
Pin and then Slip stitch the opening closed so that it covers the remaining seam allowance.
Turn the bag inside out and give it a really good steam press with an iron to ensure the lining is all sitting nicely and flat against the foam.
And you’re done!
Or here’s the original version with embroidery and EPP Hexies. All ready for your mini iron.