Testing
Sep 22, 2025
Tune in to Live@7withHelen Thursday nights at 7pm on Facebook and YouTube for great deals, demos, sneak peeks and more.

Appliqué The Gluestick Way
Jul 17, 2021
By
wequiltva
2 comment(s)
We apologise that due to the closure of our previous blog platform, some images and links below are no longer active and cannot be restored or supplied.
This is an old tutorial post that was posted onto madam Samms blog. Her blog is no longer active and the links are broken, hence I have decided to reupload it for you all.
happy stitching
Hugs
Helen
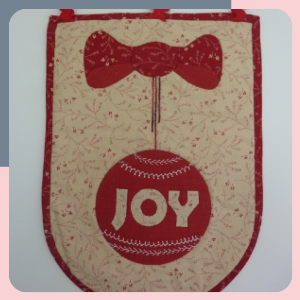
Wow, what an honour to be invited to be a regular visitor to Madam Samm’s blog for you all… but being a very busy time of year for us all, particularly down here in Australia as we are heading to our big summer break and end of year activities…. I have had to quickly make something up for you last night…. not so bad, that means you too still have time to make it for Christmas…
so, I thought I’d show you my gluestick appliqué technique. If you have always been scared of needleturn appliqué but love the look, then this is the answer for you.
what you need:
A Sewline Glue pen (and why you’re at it get a few refills too)
Hugs 'n Kisses applique paper
Some fabric – about two fat eights
and some needle and thread…
to make this:
First, download and print out the template page. Trace each appliqué piece (from the reversed sheet) onto the non fuse (the non shiny) side of the applique paper – I like to use a Sewline ceramic pencil to do this.
where one piece sits under another make a mark so you know you do not need to turn this edge under.
Cut out each shape smoothly.
fuse the pieces to the wrong side of your chosen fabrics.
cut out leaving a small seam allowance – about 1/8” is enough.
Clip into inner points and curves only.
Using the Sewline glue pen (yes you can use any water soluble glue stick but these are much less messy, go on blue and dry clear so you can see where you have been, and are sticky enough to hold instantly)
run a line of glue around the edge of your applique paper template – just do a small section at a time
Using a thumb and finger press over the seam allowance onto the glue.
take care to get nice smooth curves – we don't want pointy curves. If you are having trouble you may need to trim back the seam allowance a little further. Continue around the complete shape BUT – remember you don't have to turn over where you made those marks – where the edge is going to be sitting under another piece.
Next, position your pattern sheet (the right way around) onto a lightbox. Smooth your piece of background fabric over the top. Using the gluepen layer and glue each piece into position (you can see the design through your fabric, use this to position the pieces).
Mark the string lines and using a grey Sewline pencil and the lines on the bauble using white (if you used a dark red fabric).
Now you can appliqué down all of your prepared pieces as normal using a blind appliqué stitch and a matching thread. I love the Superbobs donuts from Superior threads for this as you get a little bit of lots of colours all housed neatly in a donut so always at hand… If you cannot get a matching thread then use a blending thread such as grey – if your stitches are correct you wont see it anyway.
Once all of your pieces are stitched down fuse some stabiliser to the back of your piece. Place it into a 6” embroidery hoop and embroider as follows:
The strings are stitched using a chain stitch. The top row and the bottom row on the bauble are feather stitch. The two inner rows are first stitched in herringbone and then a pistil stitch is placed at each inner junction. I used a cream Presencia Finca Perle #16 thread and a Hugs ‘n Kisses Stitchery needle.
You could choose to do more, different or no embroidery – just thought you may like to practise your newly learned skills from Stitched Sundays.. if you don't remember them you can always download my new Hugs ‘n Kisses App – there are links on there to each step by step tutorial and diagrams of many stitches. – and its free…
To finish your little banner layer with batting and backing and bind the outside edges – I curved the bottom edge so a bias binding is better for this curve. Place some hanging tabs at the top and hang your little banner of Joy.
So now you can master perfect appliqué circles- everyone's biggest fear…. and I love circles and use them in so many of my designs so this works perfectly for me also..
Are you signed up for my newsletter? because starting today there are 12 day of wonderful Christmas surprises and specials. not too late, sign up now or keep an eye on the Facebook page.
happy gluesticking….
hugs,Helen
'
2 Item(s)